Around 30 members attended to spin, chat and have a good look at our proposed new venue, the Highland Hotel in Strathpeffer. The room allocated was big enough to accommodate us comfortably, and had a homely feel, which soon had people re-arranging chairs into informal groups. More seating was available in the breakout area next door, where flasks of hot water and mugs were laid out for us to make tea and coffee. This area proved the ideal place for the boxes for library books, with sofas where people could relax and browse. We were able to open the patio door onto the terrace, and could also have sat out there to spin.
[envira-gallery id=”86878″]Author: Stephanie Hoyle
-
Double Weave Workshop May 2022
Our first face to face workshop for over two years was tutored by Christina Chisholm, a very experienced weaver, who is also very good at explaining things. She also used samples from her Certificate of Achievement to show what we we’re aiming at.
In double weave half of the warp threads are used for the top layer, half for the bottom layer. Though it is possible to use a two shaft loom and a lot of pick-up, ideally you need 4 shafts or more. For this introductory workshop we were all working on 4 shafts, using shafts 1 and 3 for one layer and 2 and 4 for the other, with a different colour for each layer. We started off weaving two separate layers – lift shaft 1 to weave the first pick, then lift 1 and 3 to get the top layer out of the way, and 2 to weave the first pick of the lower layer with the other colour; lower all shafts, lift 3 to weave the second pick of the top, then 1, 3 to get the top layer out of the way again, and 4 to weave the second pick of the bottom layer. Once we got the hang of this we changed to bring the lower layer to the top. Concentration was needed to remember the new sequence: 2; 1, 2 and 4; 4; 2, 3 and 4.
The next steps were weaving double width cloth and tubes. Where the weave was continuous round the edges Christina used a string, weighted at both ends, passed through the reed a space beyond the last warp, and hung across the loom from front to back. This helped to keep the edges even, so that when the cloth was opened out the weave was neither to slack or too tight where the fold had been.
Finally Christina demonstrated the use of pick-up to exchange groups of threads from top and bottom to make surface patterns (some of us had a go at this), and showed samples of deflected double weave. A most enjoyable and very successful workshop
-
Dyeing Challenge Jan 2023
Inspired by Fiona Dendy’s procion dyeing on grey fleece, members of the dyeing interest
group agreed to consider incorporating this into a challenge for the winter months.
The details will be finalised at our meeting on December 3rd but are likely to include the
following ideas:
• Grey fleece dyed with a range different colours
and/or
• Grey fleece dyed with a range of different/alternative dyestuffs e.g. hair dye -
Weaving Challenge Jan 2023
Following the example of the spinning group we are setting a weaving related challenge for
January. This is not restricted to those who join in the monthly zoom. It’s open to
everyone to join in and have fun! You won’t need to get any fancy equipment, in fact (and
I’ve just thought of this!) part of the challenge could be not to spend anything. As with the
spinning and dyeing challenges, bring anything you make to the March meeting for show
and tell, and if you are willing, loan an item to the Guild for display at the summer shows. If
you find it easier to have a theme, we suggest: trees
Things you might like to try to challenge yourself:
• Off-loom weaving – make a weaving round a tile, card, box, or go multi-dimensional
on a piece of twisted hazel
• Incorporate found materials – grass, sticks, shells, plastic bags etc
• Use a fibre or yarn you haven’t used before
• Use a kind of loom you haven’t used before
• Try a new pattern or technique


With yarn spun from a piece of fleece, Norah wove around this seedhead
Weaving Interest Group 28 January 2023
This month was a show and tell of things made, started or planned as a result of the January challenge. Several people had tried or planned off-loom weaving: Sarah had an old PE hoop and was planning to weave a hanging; Linda was experimenting with weaving on twisted hazel, and had made a frame of spindle wood, with the intention of weaving a tapestry; Isobel had woven round a couple of stones, but hadn’t enjoyed the process, though the results were attractive; Susan was considering this too, but we all felt she might be better using her stone as inspiration as it seemed a pity to cover it! Ruth had been to a weekend course in passementerie, and showed us a fringe woven using some of the techniques she had learned. Angela had woven a piece with supplementary warps which she then used to gather it up for shibori dyeing. She had also woven a 4-shaft pattern and colour and weave sampler, and was planning a black and white scarf using some of the patterns. Isobel had also been weaving with multiple threads of thin cotton – this gives lots of opportunity for colour blending, but the threads tended to be a little unruly! Henriette had incorporated beads into a weaving, using a thin supplementary weft to carry the beads. She had also tried tablet weaving, producing an impressive band which included lettering. Hilma was trying a simple weaving on card, and had also completed a weaving experimenting with stripes based on the Fibonacci sequence, and a weaving recreating the structure of a piece she had been given. Beside all of this my own scant inch of monks belt on the inkle loom looks a bit pathetic!
[envira-gallery id=”87005″] -
Spinning Challenge January 2023
Open to everyone in the guild, the spinning challenge is intended to be fun and to
encourage each other to be productive with our spinning. There will be one afternoon and
one evening spin-along session on zoom on different days each week during January and
we particularly hope that newer guild members will join in the fun. It is a great opportunity
to get to know other members informally, put some names and faces together, find out
who is interested in what in the world of spinning and discover who can answer questions
and help with techniques or difficulties you may be having. You can use the guild facebook
page to share pictures of your work if you are on facebook, but all communication will be
by e-mail so members who do not use facebook will not miss out on any information.
There are a number of different things in the challenges to do with friendship, fibre and
frivolity, and you are welcome to try as many or as few as you wish, and to spend whatever
time suits you on the activities. The challenge is not a competition, it’s just a chance to
socialise, maybe try something new and get some good spinning done while the weather is
poor and the daylight hours are short. If you are interested in the spinning challenge
contact me (see December newsletter) and I will send you the details of the challenge, the
list of activities and I will add you to the e-mail list to receive the links for the zoom
meetings.Sue has sent the first photo:
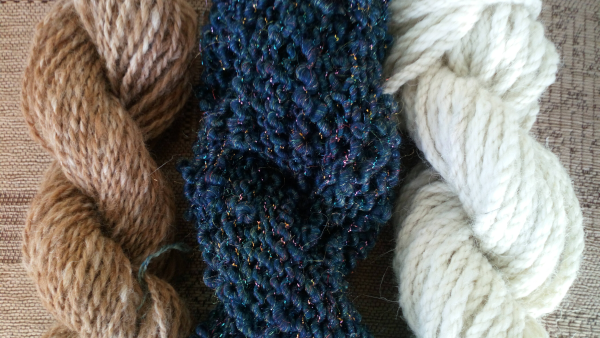
This is what she says about the skeins:
The fawn/brown skein is alpaca, it’s a standard 2-ply but done on a handy Andean plying tool (borrowed) – a new piece of kit for me, which I liked a lot and it’s now on my “must have one” list.The white skein is from a blackface fleece, it’s construction is similar to a cable but it was done by chain plying first S-wise, then more S-twist was added before I chain plyed it again Z-wise giving a 9-ply yarn in total. It’s seriously chunky, spun at 16 yarns per inch with the final skein being just over 3 yarns per inch and it’s for a hearth rug I want to
weave.The blue skein is a commercial merino and stellina blend core spun and spiral plied with a multi-coloured lurex commercial yarn which I was lucky enough to find in a charity shop.
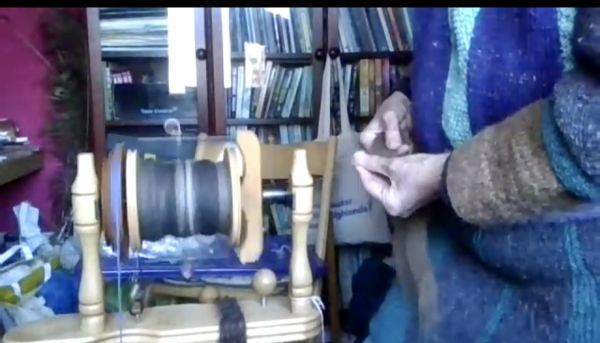
Sue spinning standing up
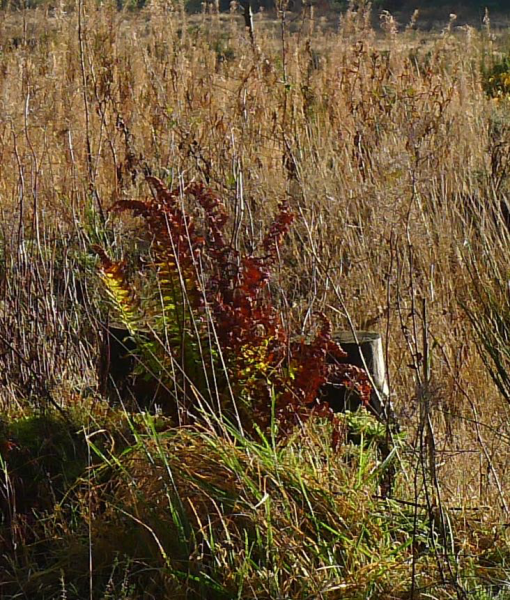
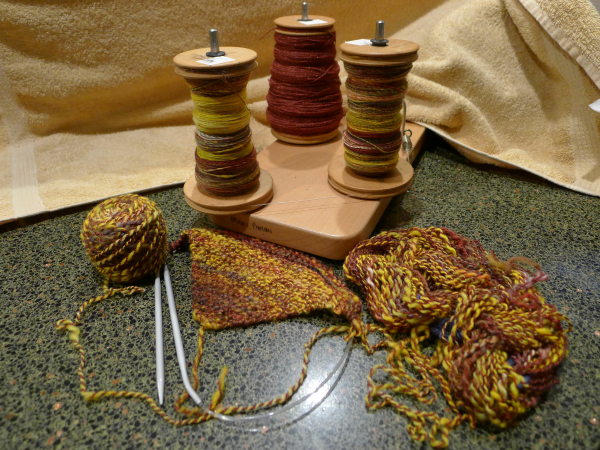
Mary’s art yarn, inspired by late autumn colours.
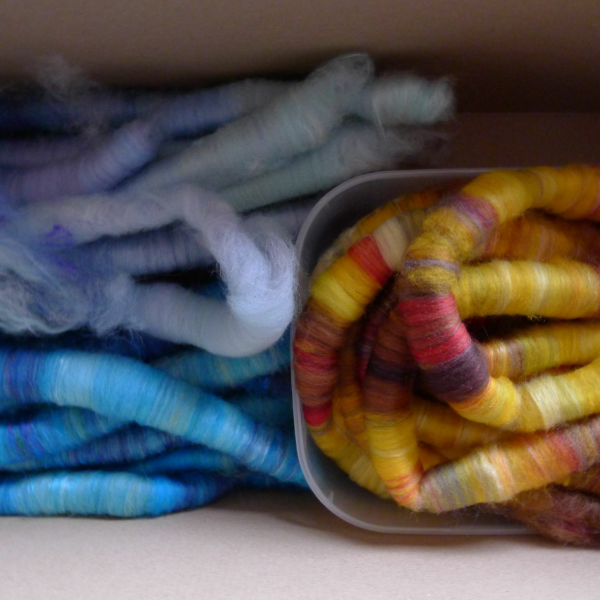
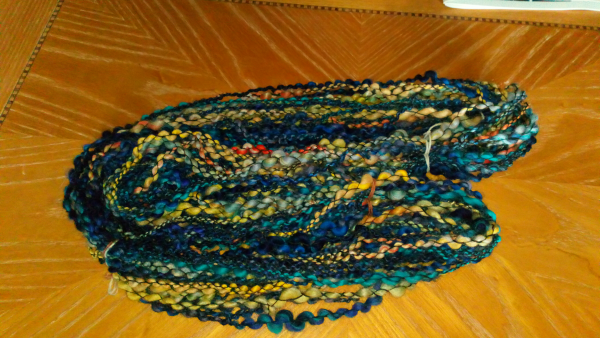
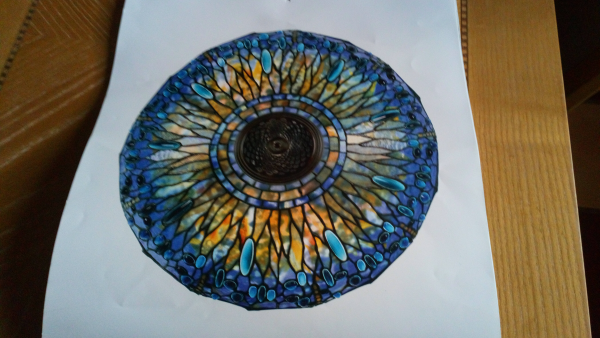
Sue’s art yarn. Her inspiration is a picture of a tiffany glass lamp. Here’s what she says:
The yarn is a bubble crepe made by plying a multi-coloured core with two separate plies of black bamboo to give the stained glass effect. The core is a simple thick-and-thin single spun from a selection of three different sets of colours – blues, yellows and pale colours, each set blended in turn on my blending board, and spun sequentially.
It is a very easy yarn to make, and I think it is my new favourite of all the yarns I’ve spun yarn.
-
Members’ Open day April 2022
April 2022 Members’ Day
The focus for the day was spinning. We had demonstrations of combing, blending board and picker. As usual there was also a lot of chat and a bit of show and tell! Sheila had brought her double weave samples to give people a clearer idea of what the May workshop is about. Aileen was wearing a jumper knitted from thick handspun singles – it looked great, was lovely and warm, and, even better, quick to make! Susan’s show and tell included all three of our core crafts: fibre she had rainbow dyed as a demonstration for the dye group had been spun and plied with black to make the colours pop, then knitted into a tube on Ann’s circular knitting machine; she also had a throw woven from yarn dyed in autumn colours and a long sampler of different patterns woven on the same warp. Denise had a hat knitted from handspun samples.
Ann demonstrated combing with full size wool combs. These are fearsome looking objects with four rows of long sharp tines, and are used to prepare long stapled fleece for worsted spinning. To start with, one comb is fixed in the stand with the tines facing upwards, and loaded with fleece to about a third of the way up. The fleece is loaded one staple at a time, with the butt ends on the tines and the tips facing forwards. It is best to remove the staple from the fleece with a sharp tug so that it comes out cleanly without pulling the fleece out of order. Once the comb is loaded it is rotated a quarter turn to the right and fixed in this position. The other comb is held with the tines facing downwards and swung down so that the tines engage initially with the tips of the fleece, then gradually moved in as the fleece opens up. Once most of the fleece has transferred to the second comb this is swept sideways across the first comb from right to left, still with the tines facing downwards, until most of the fleece has been transferred back. The process is repeated until the fleece if fully opened up. The fleece is then drawn off the comb through a diz to make a sliver. A diz is a concave piece of shell / bone / wood / plastic with a small hole in the middle – the hole should be the same diameter as the yarn you want to create. To get started you twist the ends of the fibres on the comb just enough to thread them through the hole in the diz, holding it with the concave side towards the comb, then gently pull through, alternating your hands to get an even pull. Keep going till only the short fibres are left on the comb. The sliver is then gently rolled up to store till you are ready to spin – no need to draft, just add twist!
Liz showed us how to use a blending board to make rolags and batts. A blending board is a piece of wood with card cloth fixed to it. Liz loaded it by anchoring fibre at the top of the board and then pulling it out into a thin film, repeating this across the board, leaving gaps to load another colour – she used two shades of blue. After building up several layers she smoothed them down with a brush rather like a flick carder, and then used two pieces of dowel to make rolags. You trap the fringe at the top end of the board between the dowels, then lift them, attenuating the fibre, and roll. Liz gets three or four rolags from a board. It is important to hold the dowels with a bit of space between them, otherwise it’s hard to pull them out of the rolag! Liz then loaded the blending board again, this time with more fibre, and rolled it off as a batt. She uses these for felting, but you could also spin from them.
Susan demonstrated the use of the swing picker, another fearsome looking piece of equipment, used to open up fleece prior to carding. The swing part has a curved base with nails projecting downwards. This moves across a base with nails pointing upwards. Fleece is fed in at the back (ideally not with the hands!) and the swing is lifted backwards by its handle and pushed forwards, pushing the fleece over the nails. The opened out fleece is projected forwards. It is important to ensure that no-one is standing close to the front of the picker as they could get caught by the nails as they swing upwards. The picker very quickly opened up a quantity of fleece.
[envira-gallery id=”4956″] -
Members Open Day March 2022
Our first face to face meeting for two years – how lovely it was to meet up again! There were 30 plus members present, spread around the outside of the big hall at Strathpeffer Community Centre, mostly with spinning wheels, though Ruth had brought a marudai and was weaving a kumihimo braid, and Susan was using a drop spindle. The room is airy, with a high ceiling, and the front doors of the centre were open, so it felt safe, and we wore masks when moving around. There was a lot of chat! Not everyone had remembered to bring their challenge scarf, but we had a very impressive array, which we displayed on the wallbars. As ever the end results were as varied, individual and creative as our members! They included a shawl knitted from the winning thread of one of the Bothwell longest thread competitions, and gifted to one of our members. Denise had brought the runner she has created from inkle bands. Michelle had brought examples of her dyeing. As a special treat we had cake too!
[envira-gallery id=”4922″] -
February 2022 – Quiz
Around 20 of us turned up to see how much or how little we know about our crafts! Once again Serena had set a challenging and fun quiz which extended our knowledge as well as testing it. The first section was about archaeology, with pictures and questions about ancient textiles. Next, 10 anagrams of the names of people associated with our crafts, some of whom we have had as tutors. See how you get on with these:
1. Find in Tail
2. Roses Balm
3. Hank R Fringer
4. Chiesa Silk
5. Bat Oxen Jar
6. Lipd Gin
7. A Plura Job E Funny
8. Yo Real Block
9. Greet Pod Oil Clown
10. And a Farm on a HandA section on silk was followed by a section on sea silk, obtained from a shellfish with fringes – an endangered creature, so not something we’re likely to be trying, though it sounds fascinating. This was followed by questions relating to the longest thread competition held at Bothwell in Tasmania. We were impressed and astonished at the length of plied thread produced by winners. Next, more anagrams – this time of the processes of turning wool into cloth, and a little easier than the names:
1. Serhagin
2. Sorcunig
3. Vinegaw
4. Dagcirn
5. Gishifinn
6. Torsign
7. Ceningla
8. Draggin
9. NipsningA literary section was followed by dyeing, then assorted general knowledge questions, and finally quotations. Many thanks, Serena, it was a great morning!
-
January 2022 – Janet Phillips, Weaver
Janet describes herself as textile designer rather than a hand weaver: she starts with a design brief, constructs the weave, then works out a threading and lifting plan, rather than the other way round. This is the way she learned to work in her first weeks at Galashiels. She uses a table loom to sample and works multiple section sample blankets, using different threading and lifting sequences. She studies the patterns produced, taking time to do this thoroughly, then selects the patterns she wants to explore further and samples again. She recommends using a light warp and dark weft for the initial sampling so that the patterns stand out clearly. (During her first year at college the students worked only in black and white, with the occasional red thread to define pattern areas.) For her second or third samples she may experiment with different colour combinations. Once she has decided on her design, she works on a 24-shaft dobby loom, but is tending to create designs which require no more than 8 shafts. She likes the cloth she designs to be functional.
To start a completely new design Janet draws a picture on a grid (e.g. a diamond) in two colours. The colours represent warp and weft, so only two are needed as either a warp or a weft thread will be on the surface of the weaving. She then looks to see how long the floats are likely to be and adjusts her drawing so that they are no more than three threads long. Next, she adds a range of notation marks to indicate different weave structures. Finally, she creates a lifting plan by looking at how the ends of the threads interlace.
As part of the sampling two or more patterns from the sample blanket may be combined as either stripes or blocks. Warp colours may be changed by cutting and joining in as if a thread had broken; threads such as ribbon yarns can be added as supplementary warps. Janet may cut all of the warp and rethread the reed to see the effect of a different sett, starting with 24 ends per inch, then 28, then 32.
Weaving a colour gamp will show how colours mix – opposites on the colour wheel tend to mix to brownish shades, closer colours enrich each other. Changing the background colour makes colours appear different. Weavers often do colour wraps, but a plait will give a better idea of how colours will combine in weaving. For stripes, Janet recommended using Fibonacci numbers, but not necessarily in sequence (this surprised me as I’d always imagined that it was done in sequence!). Janet likes to dye her own yarns. Using cold water dyes she can dye her prepared warp – a long length of guttering is useful for this!
Different types and qualities of yarn can add design elements: e.g. alternating bands of wool with bands of silk on a silk warp – when washed the wool pulls in, leaving the silk softly pleated. Use of energised or elasticated yarns give a naturally pleated fabric.
Janet summed up her approach to design:
– Work a multi section sample blanket on a table loom
– Study results, select and sample again
– Try different setts
– Use Fibonacci for stripes
– Use an idea source for colour and form – e.g. cut a strip from a photograph and use this to decide on colour proportions
– Join together samples you like
– Try colour changes in the warp
– Try mixing yarns of different fibre and weight
– Try using supplementary warps. -
December 2021 – AGWSD Summer School
The Association of Guilds of Weavers, Spinners and Dyers (AGWSD) holds a week-long Summer School every two years, with an exhibition in the year in between. The exhibition was cancelled in 2020, but after some uncertainty, the Summer School did in the end go ahead in August 2021. It was held at Writtle University College near Chelmsford in Essex. Three Guild members were able to attend: Denise Carroll, Katharine Bagshaw and Serena Mason. Serena was unable to join us, but several people who had attended previous Summer Schools agreed to share their experiences.
Denise had tried to get on a Summer School course several times previously, but been unsuccessful. This time the application form had a tick box for those who had not been to the previous one, and they were given priority. The course she attended was tutored by Janet Phillips and was for beginners to 4-shaft weaving. The tuition was excellent, and Denise has come back with a sampler of 4-shaft patterns, a netting shuttle bought from the trade fair, which will work as a shuttle and pickup stick combined, and a lot of ideas. She had also learned from Christina Chisholm that the AGWSD has now developed a Foundation Course in Weaving for which Christina is a tutor. We will try to get her to come to a Weaving Group zoom to talk about this.
The course Katharine initially chose was cancelled, and by then her second and third choices were unavailable, so she chose entrelac knitting from the courses which still had spaces. This was something completely new for her, though she had done entrelac crochet before, and she enjoyed learning a new skill in the company of other, mostly middle aged, women of widely differing backgrounds. Katharine also spoke about the exhibition at the end of the week, which included submissions for the Association’s Certificates in Achievement (C of A), which are judged at the Summer School.
Sadie Paige had attended the exhibition at the 2017 Summer School just to see the C of A entries as she had just started work on the C of A for Tapestry Weaving. There followed quite a bit of discussion about the requirements of the various C of A courses and the apparent emphasis on good presentation; also the facilities provided for display at different Summer Schools.
By coincidence Mary Paren had attended the 2017 Summer School (we didn’t know Sadie then) to do a spinning course: Flora not Fauna – focussing on developing the skills to spin all sorts of plant fibres. She also commented on the C of A displays and the contrast between an obviously artistic display and one where the work was simply placed on the table.
I showed some photos from the Summer School I attended in 2011, then in the afternoon, Fiona Dendy who was unable to attend in the morning showed photos from the tapestry course she did at a later Summer School.
The photos show: some samples of Katharine’s entrelac, C o A submissions in 2021 and 2017, and pictures from the course Mary attended.
[envira-gallery id=”4797″]The afternoon craft and chat session included more discussion of Summer School and C of A submission, as well as samples of spinning, knitting and dyeing members had been working on.
[envira-gallery id=”4812″] -
November 2021 T J Frog – Dorset Button Decoration
Tania Jane “The Button Lady” of T J Frog tutored our November workshop. We had the opportunity to buy a kit from her beforehand which had all the materials needed to make 2 decorations which could be hung on a Christmas tree. I almost didn’t buy one as I thought I could probably assemble enough bits and pieces, but I was glad I did. It was nice to have everything to hand, and meant I could focus on the process without having to worry about having appropriate materials. We had a choice of three colourways – I chose blue and white.
Tania started off by saying there are four basic techniques to making Dorset Buttons, and that these can be used at any scale:
1. Casting
2. Slicking
3. Laying threads and beads
4. Rounding
She worked through each stage with us, showing us what to do, and with great patience undoing and re-doing till we got it! She also talked about the history of Dorset button making while we completed each stage.Casting, the first stage, is covering the ring, which forms the basis of the button, with blanket stitch. A rule of thumb for calculating the amount of yarn needed for this is to convert centimetres to metres (e.g. a 3cm diameter ring needs approximately 3m yarn). The blanket stitching needs to be evenly tensioned and close together. Once the ring is covered the blanket stitch is rotated so that to ridge is turned to the back (slicking). The yarn is not cut – it is needed for the next stage.
The next step for us was to add beads to the yarn. In the kit, Tania had provided an ordinary sewing needle threaded with a short piece of yarn, knotted into a loop. This was for threading the beads onto the yarn used for casting, as a darning needle wouldn’t go through the beads. With the end of the yarn looped through the thread on the needle it was easy to get the beads onto the yarn – 24 in all.
Tania then made laying the threads and beads look easy as she worked round the ring as if it were a clock face, neatly distributing two beads at each side as she went! We were slower and needed some repetition! The point where the yarn finished after casting is 12 o’clock. The first wrap goes from 12 down the back to 6 and back again, with two beads left at the front by 6 and two by 12. The wraps then go 7-1, 8-2, 9-3, 10-4, 11-5, leaving two beads at the front by each number on the imaginary clock face. The needle is then taken up the back and in between 11 and 12 and across and down between 5 and 6, then up between 2 and 3 and across and down between 8 and 9. This makes a cross which holds the spokes in place, and is secured by taking the needle through the threads at the back. The cross might need a bit of a tug to centre it properly. The spokes can be manipulated into a better configuration too if they are not evenly spaced.
The final stage is rounding. First, we worked two rounds of backstitch (over 3 threads, behind 2) at the centre, then we slipped one bead down each spoke to the centre and worked another row of backstitch around them. With the rest of the beads, we alternately pushed them to the centre and to the outside, working backstitch around again, then a final round of backstitch round the outside. The curtain rings in the kit had an eye at the top, so we blanket stitched around that for completeness. The we just had to attach the ribbon, and the decoration was ready for hanging.
[envira-gallery id=”4746″] -
October 2021 Trisha Gow – Fungi Dyeing
Trisha Gow is a tapestry weaver, who discovered fungi dyeing when she attended the Battleby Gathering in the 1980s. She is a member of the Scottish Fungi Dye Group, and has attended the International Fungi and Fibre Symposium several times. Apparently, there is no historical record of the use of fungi dyes – research began in the 20th century. Unlike other natural dyes fungi dyes are not available commercially, and are not normally grown as garden plants so learning to identify dye producing fungi in the wild is important. Trisha suggested getting a mycologist to lead a fungus foray. Fungi dyeing is generally ecologically sound, so long as only the mature fruiting body is collected and only a few taken from each site – once the cap is fully opened it will have shed most of its spores.
The colours obtained from fungi include a range of reds, yellows, greens and purple, but no blue. Trisha advocates using an alum mordant then using an after bath to modify – ammonia and soda to brighten, iron to sadden. If fungi are not to be used immediately, they can be spread out to dry on absorbent paper – cold water soak to reconstitute before use. To dye, bring up to just below boiling point (you can use a pan of water, slow cooker, microwave, solar dyeing – but nothing you are going to use for cooking food!). The PH of the water should be around 9. Large bracket fungi should be broken up. The caps and stalks of some fungi give different shades, so try them separately the first time. Don’t throw the fungi away after one dye session, they may have more dye to give, and they can be dried to use again. Keeping records is important – quantities used etc.
Trisha went on to show us some of her samples: a tapestry woven from fungi dyed wool, a silk scarf, a spindle bag; and also some of her record books. Guild members who had been on the fungus foray with Trisha then gave feedback on the results from the fungi samples they had been given.
[envira-gallery id=”4759″]In the afternoon the dye discussion continued with samples of dyed skeins and fibre; plus some lovely samples of felting.
[envira-gallery id=”4787″] -
September 2021 Johnny Shiels, Wheel Maker
Another interesting meeting I wasn’t able to attend! Enclosed is the write up from Norah:
JohnnyShiels -
August 2021 All About Cotton
I wasn’t able to attend this meeting, so the write up is thanks to Liz. I clearly missed a very interesting meeting which looked at spinning, weaving and dyeing cotton, with contributions from several of our members. It’s attached here as a document:
Cotton spinning -
July 2021 Cally Booker – Weaver
Cally gave an inspiring talk on her life as a weaver from how she got started to the work she is doing now. She described her journey as a series of accidents! Cally lives and works in Dundee and her walk from home to her studio in an old jute mill takes her through a park, which is a source of inspiration to her. She makes scarves and wraps for retail, but not in huge quantities – each one is unique. She runs courses at her workshop, and now on line, and has been involved in a variety of collaborative creative projects.
Cally’s weaving career began in 2003, when her mother was unable to go to a weaving workshop she’d booked, and persuaded Cally to go in her place. She was hooked, and came home with a second-hand loom. Two years later she signed up for the Bradford Textile Course 2005-2007. In 2010 she acquired a Louet Megado 16-shaft mechanical dobby loom, and in 2012 was able to rent studio space in the newly refurbished Meadow Mill. The space was bigger than anticipated and enabled her to start running workshops. In 2019 a different space became available at the mill – lots of windows, so unattractive to artists who needed wall space, but ideal for weaving. In 2020 a Toika computer operated loom, ordered to replace the Louet Delta Cally used at home, arrived just as lockdown was starting, giving her the ideal opportunity to explore its possibilities.
[envira-gallery id=”4664″]Cally went on to talk about her weaving and how she produces some of the effects. First she showed us two pictures entitled Faces and Lines – a twill on the right with colour shading in the warp, and on the left a piece showing colour effects from changing from weft emphasis to balance to warp emphasis. Using double weave threading and a range of colour and treadling sequences she produces pieces with subtle curving lines; Mystery Beyond the Mountains is woven mostly in cotton, but the red thread between the black and white squares is wool, giving a 3D effect when washed. The pattern on the Graffiti scarves was not planned out beforehand, Cally improvised while weaving; however Yardage was carefully planned to get the tessellated leaf shape. The patterns headed Data reflect environmental statistics. Lost Ice for example represents the extent of the Polar ice sheet in 2016 (one pick represents one day) compared to the 30-year average.
[envira-gallery id=”4673″]Sound of the Sea resulted from a collaborative project with 5 other textile artists, and represents the spectrogram of the sound of the sea at Pittenweem. In 2019, Cally and brass worker Jen Stewart, using the sound waves from hand washing to Happy Birthday, created protective armour (Ceremonies of Safety). In October 2019 Cally was one of four Scots on an Applied Arts Scotland residency in Halifax Nova Scotia. They were paired with four locals – Cally with Andrea Tsang Jackson, a quilt maker. They used offcuts of material from a firm which makes children’s rainwear from recycled plastic; the end point of their work a video animation which Cally showed us. The residency was one week, so most of the communication was by phone, zoom etc. Cally’s current project is Sound + Weave + Video.
[envira-gallery id=”4690″]
